|
Bridges! Probably the second most prescribed exercise in physical therapy clinics across the U.S. Second only to clams. So much going wrong with them basically every time I see someone do them. And they are a great exercise for hip extension and building those #glutesofglory so today’s post is a quick tip on using better form.
Feet closer to bum = more glutes, further from bum = more hamstrings. Make sure to get a great 360 inhale first then exhale and use your lower abs to tilt pelvis posterior, pushing low back into the floor. Hold a nice brace at the end of your exhale and inhale again, still maintaining a gentle abdominal brace. On the exhale, tighten your brace slightly and push the ground away from you, contracting those glutes. Remember 1.0: pubis in same plane as lower ribs, and ribs knit down with a nice abdominal brace. Breathing 360 under a brace is a skill and you may need to practice this. A lot. No breath-holding here, please! Remember 2.0: don’t make your back work to create the movement. Keeping good core control will help keep the paraspinals soft so you can focus on using those glutes appropriately. Remember 2.1: breathe throughout the entire exercise. NO BREATH-HOLDING! Try it out and see what you think!
0 Comments
Recently, I got to attend a natural movement class from MovNat Madison hosted by Mindful Motion Physical Therapy, here in Madison. It was so much fun! I discovered a fun little hip mobility move...and that crab walking is way harder than it looks!
My left hip is often much tighter but a few reps of these and it was nice and loose! Plus, it is great practice for ground mobility and transitions from sitting to standing, which is very important as we age. Hands free is the goal! Remember, happier hips = happier pelvic floor. Try it out and see how it feels! How did you do?? It’s a special Halloween edition of The Pelvic Underground. I even dressed up for the occasion!
Here’s something scary...tight glutes and pelvic floor! One of my recent favorite self-myofascial release tricks. This one targets pelvic floor from behind and specifically deep hip rotators. It is delicious for getting a femur (the “thigh” bone) that sits too far forward in the socket to rest back and center. Got a tight pelvic floor, hip impingement, or a labral tear? Try this out! First, lie on the floor with knees bent and feel what you feel, particularly how much floor you can feel with your bum. Is one knee higher than the other? If so, do that side first and most. Next, find your midline between #glutesofglory and then feel for your tailbone, place the ball an inch or so above and to the right or left of the tailbone. Don’t rest *on* the bony areas, find flesh. Then rest in that spot, breathe into it and feel yourself #relax into this. It should NOT hurt. Then move across your glutes doing this same thing until you reach the back of your “hip bone” (posterior portion of the greater trochanter). Remove the ball and now see how it feels. How much more floor can you feel? Does it feel like a wide open space now? That’s your femur resting into position 😎 Are your knees level now? Excellent! Happy (belated) Halloween! 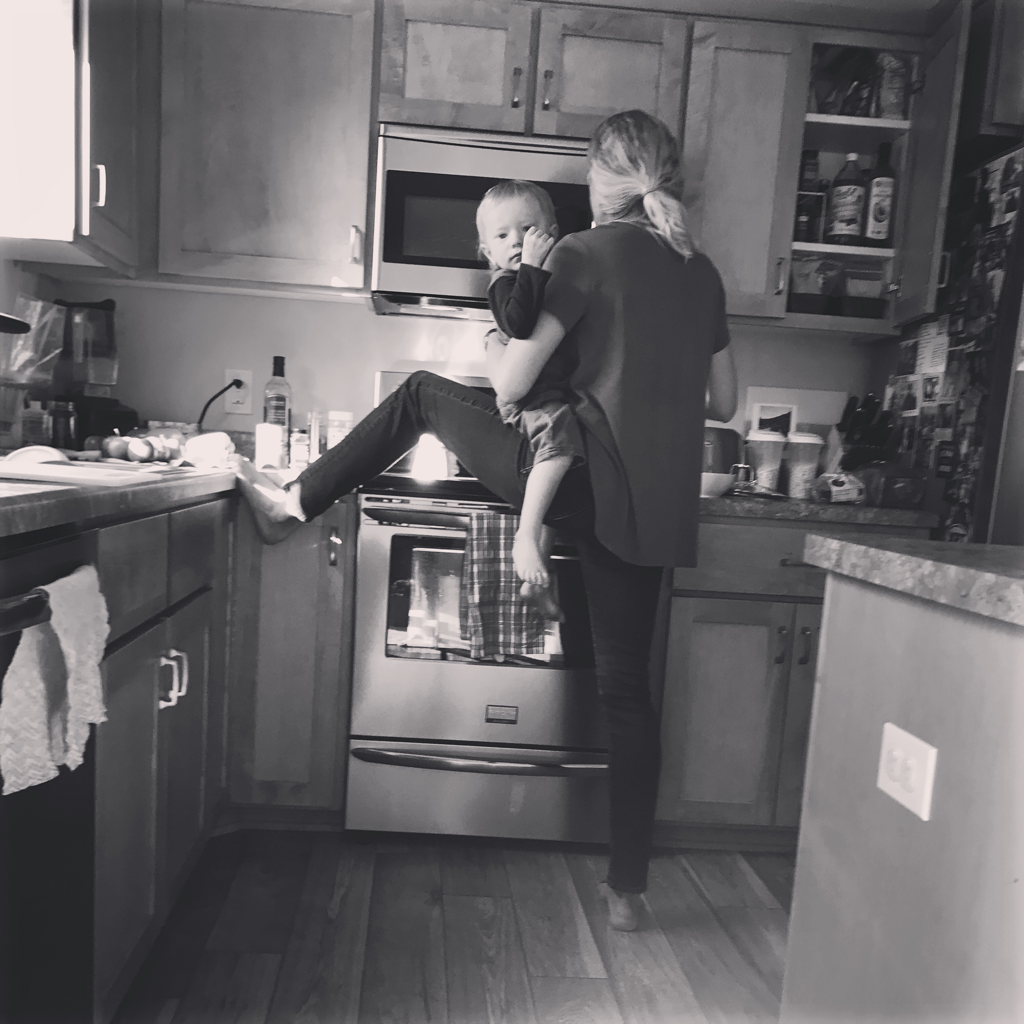 Sometimes (a lot of the time) this is parenthood and you do what works . My arm was tired. I stir with my right and don’t want to exacerbate a muscle imbalance I have worked hard to re-balance since becoming a mom so I kick up a leg and my cute toddler can rest on my thigh and my arm gets a rest. Bonus: I can work on relaxing my hip flexors, engaging my #glutesofglory , core stability, and breathing into my glutes to get them to lengthen on the left.
Of my two kids, he is more of a Velcro baby still, and he loves to watch me cook. So it shall be 😎 {Last night’s dinner was a vegan Moroccan carrot red lentil soup. So yummy, so chunky, so easy.} When you are growing some #glutesofglory they sometimes need us to show them some myofascial release love.
Here is an easy one you can do without having to flop around on the floor or get awkward with a foam roller. But that is fun, too! Grab ye a small ball. I have a tennis ball and a racket ball that is slightly smaller and less squishy. Lean against the wall with the ball placed in the glute area. Roll around until you find some hot spots and hang out there some and see what you can work out. Breathe into the really sticky spots. Make sure to also spend some time in the gluteus medius which is along the upper rim of the pelvis. Stay OFF of the outside of your hip (greater trochanter). That’s a no-fly zone due to the feisty bursa there. After 30-60 seconds on each side, jump into your glute strengthening and you’ll reap much greater rewards. What you release, you must then teach. Otherwise you’ll just keep losing the gains. And remember...your glutes ARE your pelvic floor and vice versa. Have fun! 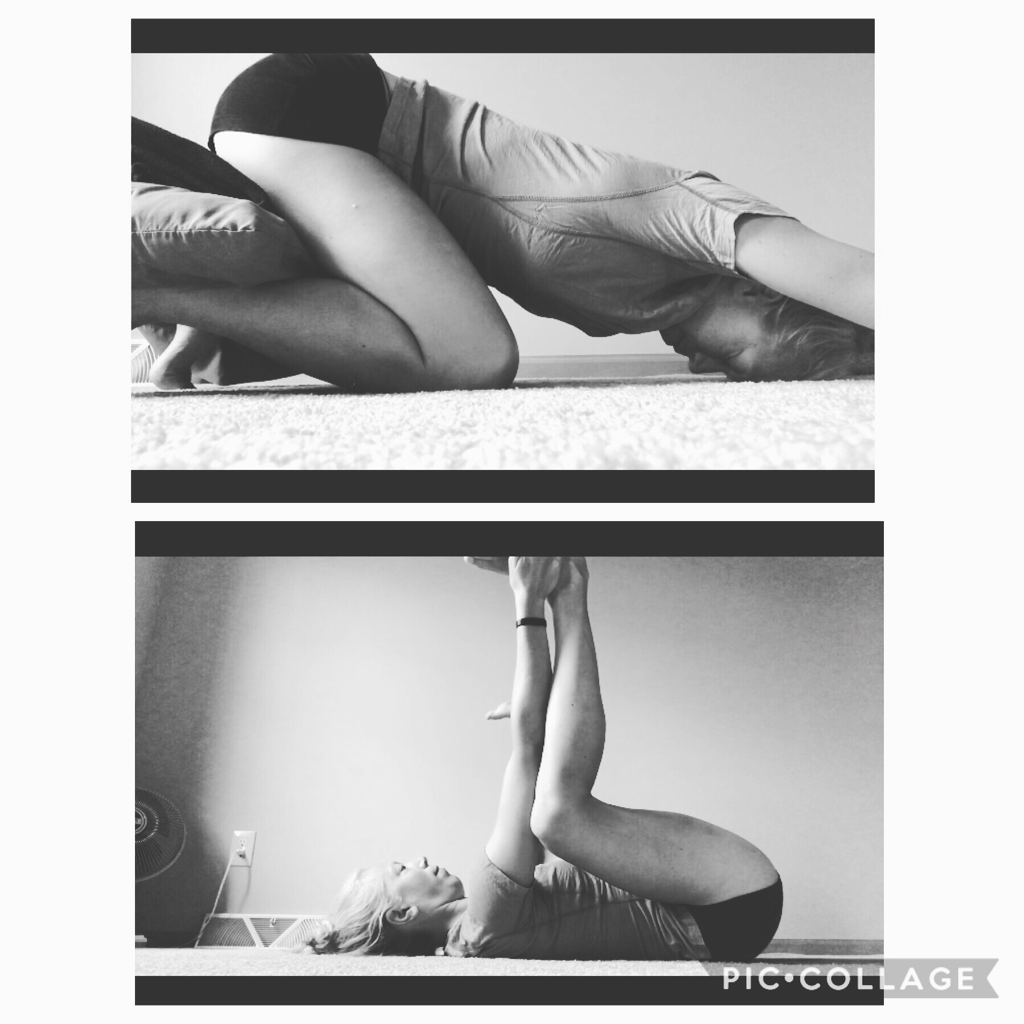 It’s hump day so how about some more stretches for a tight pelvic floor? Sure!
Now, I say "hypertonic" because that is unfortunately the verbiage used most commonly, but it implies something neurological in nature and generally that is not the case. What we should actually be saying is a "tight/weak pelvic floor." Because, anything that is tight is also weak, just as anything that is loose is also weak. But loose is also a terrible way to describe a hypotonic pelvic floor (which is less common). I digress... Back to a tight pelvic floor! Happy baby pose is another favorite of mine. Bottom photo is the typical way it is performed. Hold your legs so they feel relaxed and shins (anterior tibialis) are relaxed as well. Breathe deeply and slowly into your belly/back/sides (360 breathing!) for up to two minutes. Note: don’t send your breath down *past* your bum, but aim *for* your bum. Breathing so far down actually puts too much pressure down and out. No need to go crazypants on us here. Top photo is a modification in a more prone position. I bolster under my bum so that my hip flexors can relax and my back stays long and relaxed. Too much rounding of the back and your canister (i.e. your core) isn’t aligned appropriately. Breathe deeply and slowly into your belly/back/sides and down to your bum. Really try to feel your rib cage expanding in your back and imagine that pelvic floor expanding more and more with each breath. Ahhhhhhh 🧘♀️🧘♀️🧘♀️ Midback rotation! One of my favorites. I always thought of myself as being pretty mobile, and then a PT I was working with asked me to rotate my thoracic spine (mid and upper back). Um, barely anything. I cheated 💥big time💥with my lumbar spine (low back)...which is a no-no.
As I watch other humans in nature moving and doing (I can’t help it!), I see a lot to be desired in the midback rotation department, especially us mamas. When you walk, do you feel your hips swishing like the agitator in a top load washing machine? Do your arms swing? If so (yay!) does your upper body (ribs and up) move any? Take a video of yourself walking and see what you see! (Little insider info: swishing hips might look sexy, but they are really not good for you in the long run.) I will save walking mechanics for another post (it’s a lot!) but for now, here is a great little mobility exercise you can do before you even get out of bed in the morning. Hold your top knee down and don’t let yourself cheat by allowing the pelvis to rotate. How far down can you get your top elbow at first? Breathe into those top ribs and on each exhale sink a little farther into the stretch. Do a few breath cycles and then roll forward. Repeat a few more times and then switch sides. Note: bend at the elbow and hold your hand behind your head for the most accurate rotation. A straight arm allows you to cheat with your shoulder complex and make it seem like you have a lot more range than you actually do have. Is one side harder? How much can you get your elbow down towards the floor without forcing but by using breath work to ease it down? Any pain or discomfort? This should be a very gentle and easy exercise. Listen to your body and only do what you can do comfortably and pain free. Lateral rib expansion. Oh so good. I have been working on this daily since January and I finally feel like I've got some! I was a chest-breather-turned-belly breather, so it was really hard for me to break those habits and learn a new pattern. It does require an obsessive focus, for sure, but it is so worth the time.
I like to first do some focused side breathing while blocking the opposite side so that I can open up tight sides and low back. Do 3-5 breaths each side and make sure you are sending that breath where you want it! Watch out for breathing too far down into the pelvic floor. I feel a crazy stretch in my side every time so I try to do at least 5 of these through the day, but ideally up to 10 times! Then, check out that amazing lateral expansion. Ten months ago, there was exactly zero movement out to the side. Oh sweet progress. Now, it is daily maintenance to keep things moving in the right direction. Some days are better than others, and I notice that stress really clamps down on my sides and back so I make sure to fit in extra breath work on those days. Breath re-training is tedious work. Real talk. Just keep chipping away at it each day and don't expect miracles early on. I like to take a lot of video to track my progress and on the days I feel frustrated with the process, I check out where I have been and where I am now and it is an instant mood lifter! I'm serious. I felt so vain at first, but truly how else will we know we have made progress along the way with these "small" things? Try this out and let me know how it goes! Part 4 of Car Seat Calisthenics!
This one will help wake up that core! I want you to think TALL, chin tucked slightly, abs engaged from the bottom up, ribcage down, and hip hinge from the glutes/hips. Only go as far down as your hamstrings allow in order to keep that good hinge. Set the car seat on something to make it higher if needed. Push through your pinkies to engage shoulders and serratus anterior (remember her? She is besties with external obliques). Don’t sink into your shoulders, engage them! Keep that core engaged throughout and move mindfully. No bearing down my ladies with prolapse...none. Do what you can, skip what you can’t for now. If walking out and back with bent knees helps, do that. Note: I have *no* baby in the car seat, which would have been helpful to keep it more stabilized. Empty made it a LOT more challenging! Note again: This is sped up 2x so take it slow, breathing through the movement! Again, think: mindful movement, exhale on the effort. Oh wait, another note: if these are too hard, modify! ~If hamstrings are a hindrance for hinging, put the car seat up higher. ~Bend knees to start and work up to straight legs if too challenging at this time. ~Hip hinge, hip hinge, aaaaaand hip hinge! ~Walk out as far as you can while keeping core engaged and without any doming/bulging/pooching. ~KEEP YOUR RIBCAGE DOWN! Yes, even in standing. ~Use a mirror or video yourself and see what is going on so you know what to fix or high-five yourself for doing well 😎 Well done 🙌 You now have a quick, four part, car seat workout that you can squeeze in without even having to wake up a sleeping babe 😁 Part 3 of Car Seat Calisthenics!
This time balance is challenged. We all need more balance, in all things 🧘♀️ I want you to think TALL, chin tucked, abs engaged from the bottom up, ribcage down, and hip hinge from the glutes (no rounded back! Only go as far down as your hamstrings allow in order to keep that good hinge. Set the car seat on something to make it higher if needed. Keep that core engaged throughout and move mindfully. No bearing down my ladies with prolapse...none. Do what you can, skip what you can’t for now. Note: I have *no* baby in the car seat. Note again: This is sped up 2x so take it slow, breathing through the movement! Again, think: mindful movement, exhale on the effort. Oh wait, another note: if these are too hard, modify! ~If hamstrings are a hindrance, bend your stance leg more. ~If single leg deadlift is too challenging at this time and/or balance is not there then do a double leg version. ~Hip hinge, hip hinge, aaaaaand hip hinge! ~Don’t use any weight and then work up. ~KEEP YOUR RIBCAGE DOWN! Yes, even in standing. ~Use a mirror or video yourself and see what is going on so you know what to fix or high-five yourself for doing well 😎 Stay tuned for part 4! |
PaigeRunner, lifter of children, PTA, CPT, PCES, pelvic health zealot Archives
August 2020
Categories
All
Archives
August 2020
|
 RSS Feed
