|
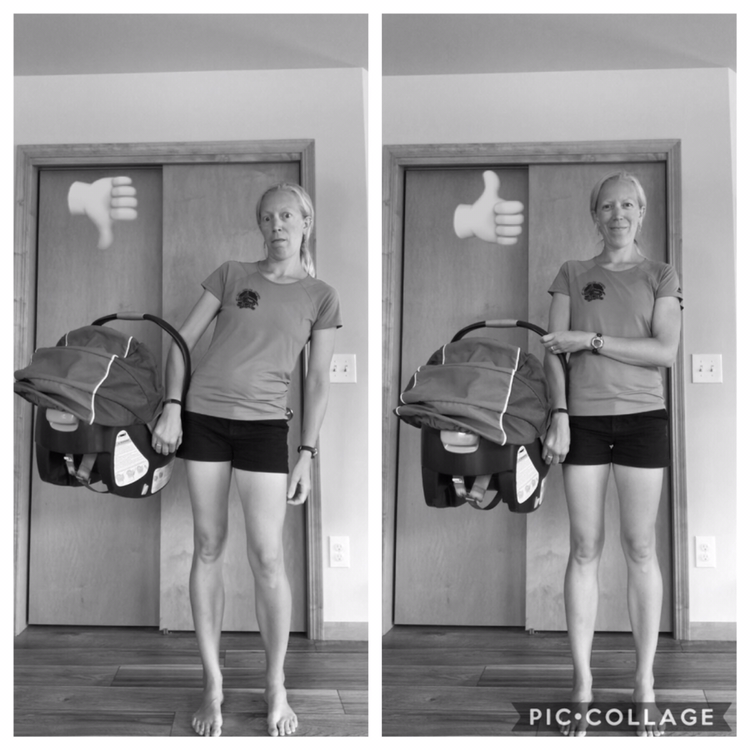
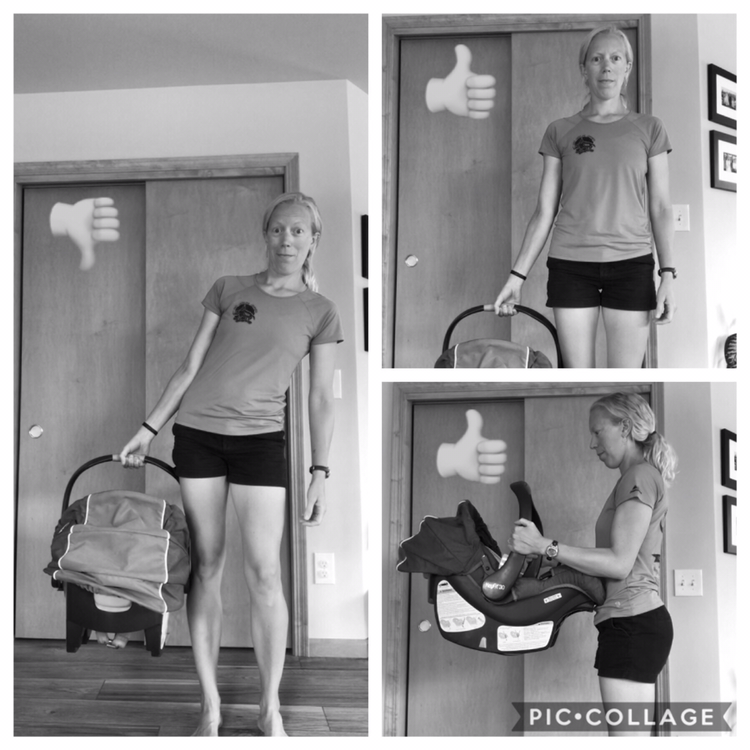
Car seats. Love them, hate them. Have to have them. So let’s carry them better, or just leave it in the car and never carry it around 😎
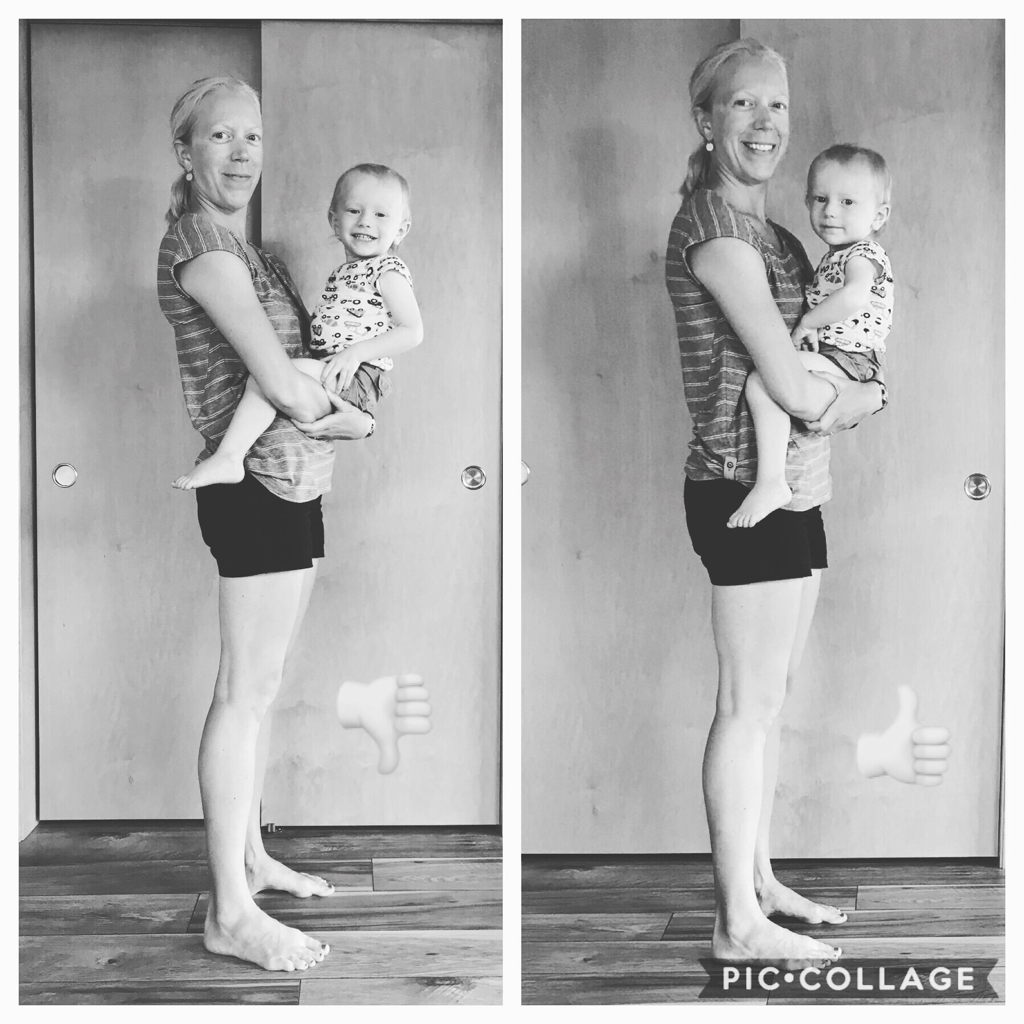
Yea right...never wake a sleeping babe! Okay, the first set of pics works best in those early days when baby is lightest. It is that super clever carrying trick that circulated the inter webs in the last few years, with a reminder to do it better. Use those abs! You still have them, they didn’t leave so get your ab work in while also living life! When you stick your pelvis/hip out you are creating imbalances and your muscles will eventually share their unhappiness with you, especially in the back and shoulder. So stop. Next set of pics is for when baby gets heavier. I once worked with a patient who partially dislocated their proximal fibula from carrying their car seat like this and letting it slam against the side of their lower leg. Ouch! This is much harder but you can switch sides and do so often! Don’t always carry on one side. The front carry technique is also great for getting in/out of the car. I have used this technique A LOT. Sure it looks funny, but if it helps you avoid all of the pain then so what? Plus, who cares? Do what is best for *you* and don’t carry your kid like a schmo 😎🙌💪
0 Comments
Car Seat “Kettlebell” Workout!
Okay, it is partially in jest but also just as much f’real. I don’t have kettlebells, nor do I have formal training in them (hence the tongue-in-cheek nature of this, and it totally works!) but I do have a car seat and it’s easy to make heavier if needed. I love being creative and using what I have. NOTE No. 1: my very critical eye sees *several* technique things I could have tweaked before posting this but I am trying my hand at #workingsmarternotharder . My pelvic alignment and core activation leaves some things to be desired 😎 Back to the workout: my seat is empty and the video is sped up 2x BUT make sure to move slowly and mindfully. Work both sides and pay attention to alignment. Knees over toes is totally okay, just keep knees aligned with your second toe, and keep heels down. Core activated from the bottom up, shoulder blades activated, chin tucked slightly, and use your core to resist being twisted to the side you are holding the seat. Walking lunges would be a fun addition, too! NOTE No. 2: I wouldn’t recommend that a child be in the seat for this but if they are make sure they are buckled in fully and secured as if you were going to put them in the car 😎 Obviously. An empty seat was weight enough for me today! NOTE No. 3: if you have a #diastasis or #prolapse make sure you are cleared for these movements and that you are managing internal pressures and breathing well. And, start with no weight and see how it feels for you. You can probably guess what the next installment in the #holdingyourkidseries is going to be...stay tuned! How about a #worldbreastfeedingweek installment of the #holdingyourkidseries , part 5!
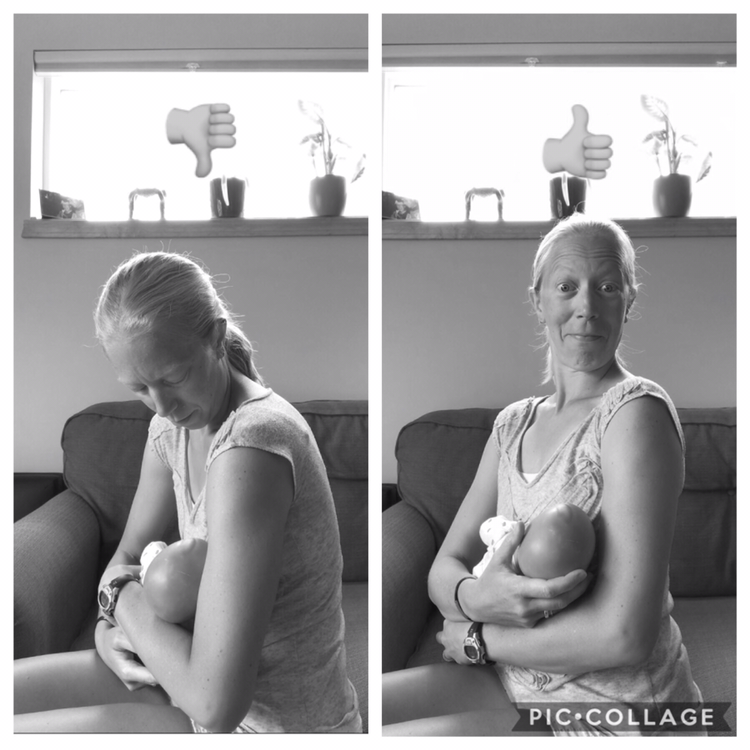
Some of you have very quick feeding sessions, and some of you have very long ones. For my breastfed kid, it was 30-60 min per side and she almost always did both sides. So, posture was so important. But even if your kid is a power eater, don’t discount the importance of posture, because it is still probably 10-12 (or more!) times each day, anywhere from 1 month to 36 months (or more! 🙌🙌). That adds up my friends! Do your best to use what you have to make you comfortable. Baby is going to be happy no matter what, and they can pick up on your feelings so do your best to relax :) I know, so much easier said than done, especially at 3 a.m. and on approximately -279 hours of sleep. Sit tall through the crown of your head, engage those shoulder blades enough to meet the demand, gently engage your lower abdominals, and breathe into your belly, back, and sides. Your head...keep it up and chin tucked and try to use your eyes as much as you can to look at your babe before you start to bend your neck. Neck and shoulder tension run rampant amongst the breastfeeding population. Take care of yourself, use your eyes. Also, use pillows, blankets, piles of yet-to-be folded laundry, etc. to bolster and get comfy! You don’t have to have a bunch of fancy gadgets for this, though I was personally a fan of the Breast Friend pillow 🙌 This goes for bottle fed babes and mamas pumping! I used pillows under the pump bottles while I was pumping because they got so heavy and caused me to scrunch my shoulders and slouch down under the weight. It was crazy! Then I got smart and found a way for it to work and have my hands free, thanks to the hands free pumping bra. And holding your baby while feeding a bottle is just as taxing on your body as breastfeeding, plus it applies to dads and caregivers! You’ve got this! Baby wearing!
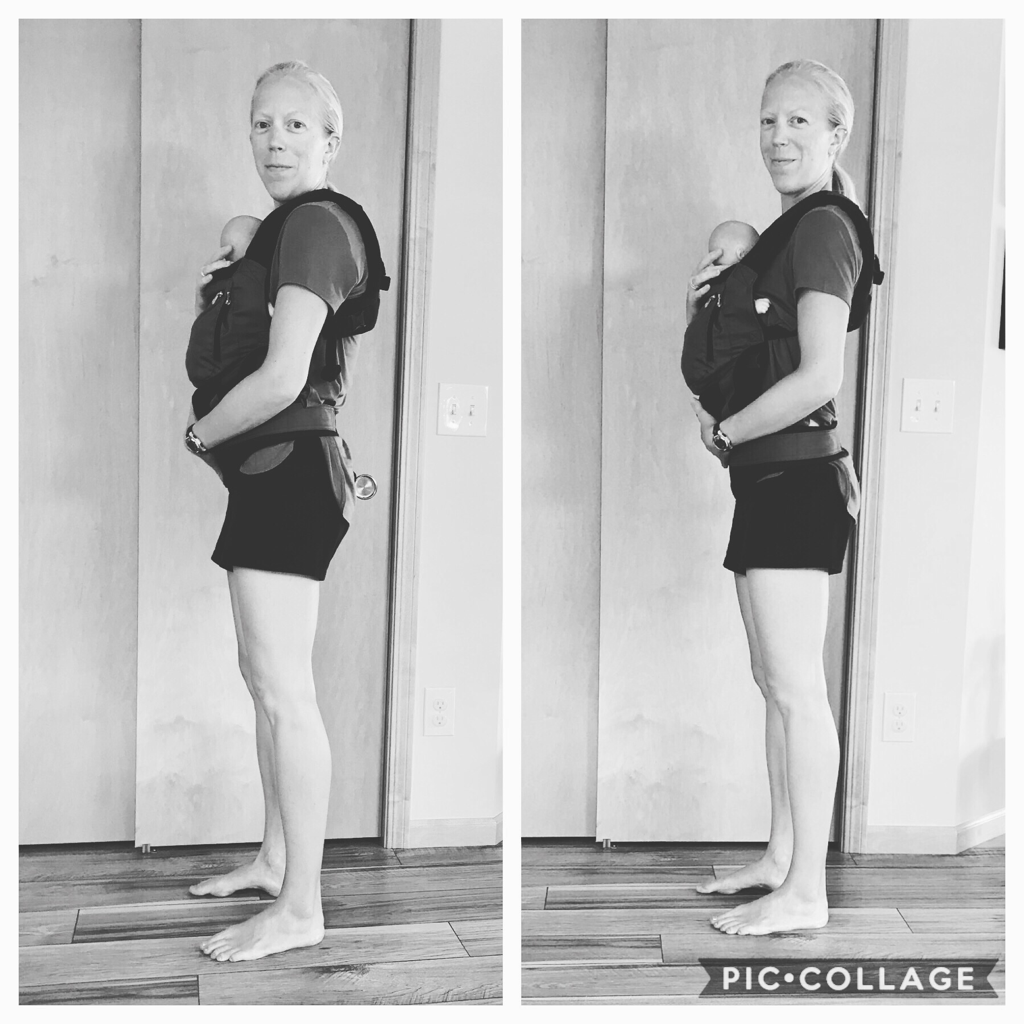
Okay, this time the adjustments are pretty subtle, but with very big improvements as a result. I got to a point where I couldn’t wear my second because it caused symptoms of prolapse. Obviously, I still wasn’t managing pressures well. Once I figured things out I could use the symptoms I felt as a feedback loop. I almost felt lucky that I was getting this instant feedback on my alignment rather than years down the road and after a lot of repetition of bad habits. So, here you go! See in the first pic you can barely see my neck, head is forward and shoulders are hiked up and rolled forward. Hips are thrust forward, knees are locked out, and glutes are clenched. Bottom strap is much too high, sitting at my waist and in the curve of my lumbar spine. What to do? Relax glutes! Move hips back over ankles, soften the knees a touch, and engage those lower abs just enough to give stability. Relax the shoulders! Your kid isn’t going to fall out if you relax. Make your neck long, and slightly tuck chin by lifting from the crown of your head. Gently engage between shoulder blades (enough to hold a feather). Move the bottom strap down across your hips. (Your low back just said, “ahhhhh.”) Think of the unconscious things our bodies do in tight situations. It wants to create tension to push against something. You have a strap across your waist? Your brain wants to push your belly out to create tension against the load, and thus stability. Something pulling down on your shoulders? Your brain wants to push up against the load and you’ll hike your shoulders up. Hips thrust forward on locked knees? Your glutes will clench to create stability from behind. This is why ill-fitting or too-tight clothing is a tricky thing. But that is for another time :) If you are a sling user, then these same principles apply, but also make sure to switch sides every other time so one shoulder isn’t always taking the load. **My kids are too heavy now for wearing so today’s model was my daughter’s doll, “Baby Jayne” 😎** First pic...ahhhhhh! Stop right there! Even my toddler knows it’s a bad position 😂😂😂 See how my back is rounded and the load (my kid) is way out in front of my center of mass? This = very bad things for my back and anterior/posterior core if it were to be a postural habit.
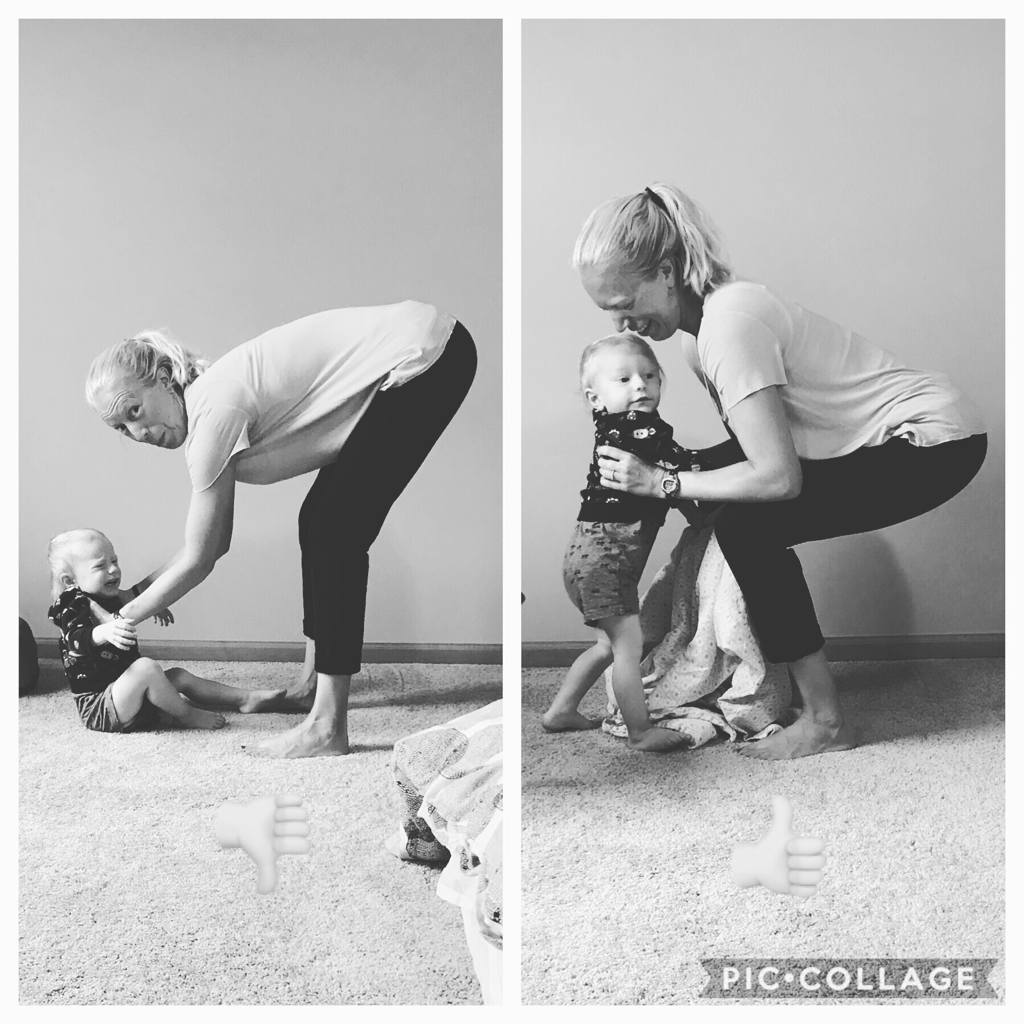
Quick fix: move in so your load is as close to you as possible and squat down (neutral pelvis, engage the core to match the task, neutral spine). Think about using your glutes and not your back or your quads for this. As you come to standing, push through your heels and engage those glutes. Use your biceps to hold and bring in the load, and once again engage the shoulder blades slightly so they can also respond to the load efficiently. Next, before you start to stand BLOW BEFORE YOU GO. This is a tip from the amazing @juliewiebept and one I use everyday with every single lift and squat (even standing up from a toilet!). Begin to blow out through pursed lips and then complete the move as you exhale completely. I like to inhale with a good 360 breath on the way down (expanding/opening up the pelvic floor and preparing it for a good contraction...because in order to shorten a muscle well, you have to be able to lengthen it first!), snag my load, then begin to blow out through pursed lips right before I push up to standing, continuing to exhale (contracting the pelvic floor* and disbursing the load nicely, avoiding bearing down). It is so engrained in me now that even my kids do it with me 😍 It doesn’t matter what you are or aren’t lifting. It could be a crumb off of the floor, sitting down to/getting up from a meal, on/off the toilet, getting in/out of the car. Practice good mechanics and mind your core and pelvic floor. Always bring the load as close to your center as possible, and harness the power of your breath. *It should be noted that for me I no longer need to *actively* engage my pelvic floor with different movements; it knows what to do and it does it. But I have done a ton of re-training and re-connection of my PF with the breath. Check with your PFPT first to determine what your strategy should be based on where you are at at that time. Part two of how to hold the heavy things better!
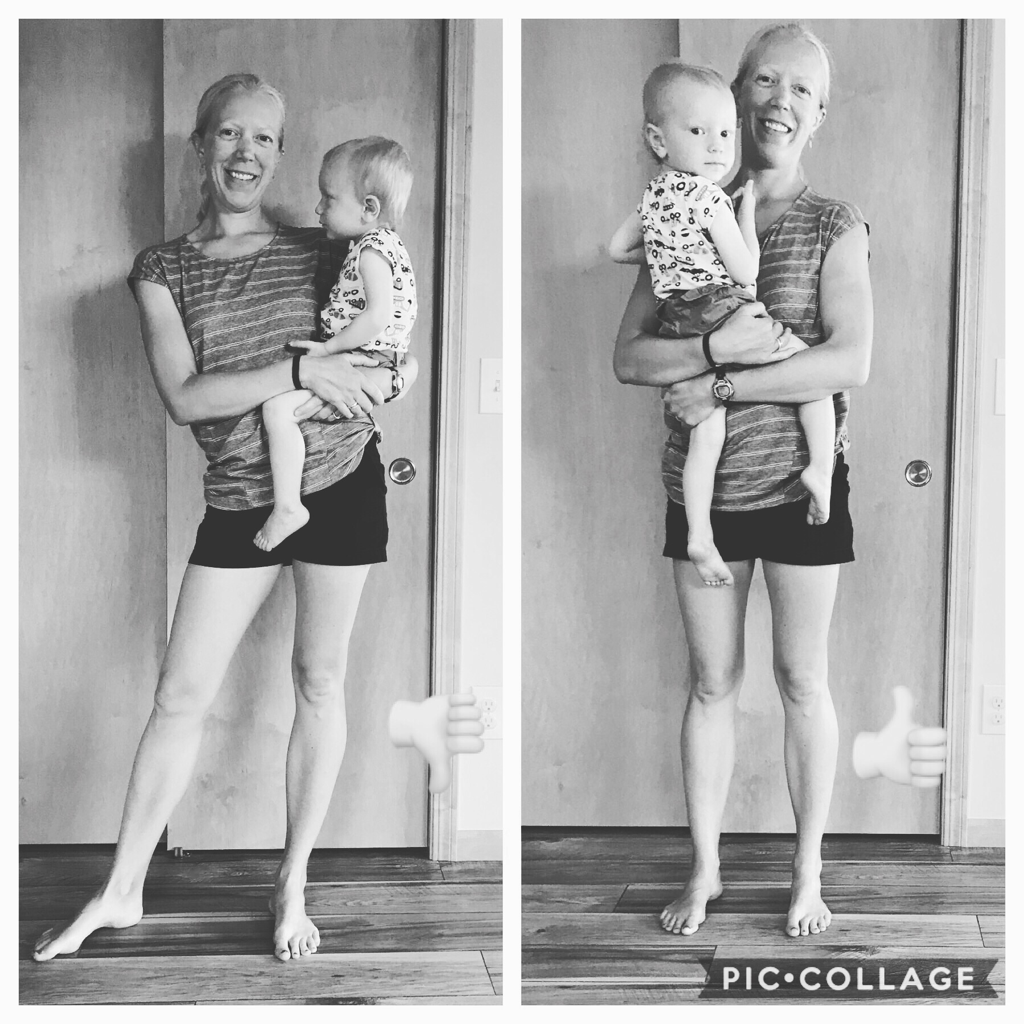
First pic...I see this all. The. Time. I watched one mama carry her kid around like this at the park recently and she even maintained this posturing after setting the kid down 🤦♀️ If I had cards I would have handed her one and told her to call me. It’s never too late to stop; there IS help. One sided pelvic pain? Weakness in one hip? One sided knee pain? Low back pain? Neck pain? Jaw pain? Trouble contracting one side of your glutes? Leaking? The list is long! Think of the domino effect of symptoms with the stance in the first pic. I see functional scoliosis and some serious pelvic issues down the road. The hard part with posture is that negative effects can take months or years to bubble to the surface, so it is really easy to brush off. But just like interest compounds over time and becomes a really big deal eventually, so too does the way in which we hold ourselves and move throughout the day. Once again, be mindful of how you carry heavy loads (kids, pets, groceries, dog food, etc.). Center your weight over both feet (you want your center of mass centered), feet forward, pelvis neutral, core (lower TAs) engaged slightly, standing tall through crown of your head, engage the shoulder blades with a slight squeeze between them, and use those arm muscles! If it’s too much, decrease the load where possible. The nice thing about the kids is that their weight increases gradually enough that you can adapt to the change in load, but it is still work! You’ve got yourself an isometric strengthening exercise anytime, anywhere! Make it active with some lunges or squats. And you *know* I have thoughts and pointers on that as well... More to come! Until then, hold the heavy things better! Or, holding any of the heavy things.
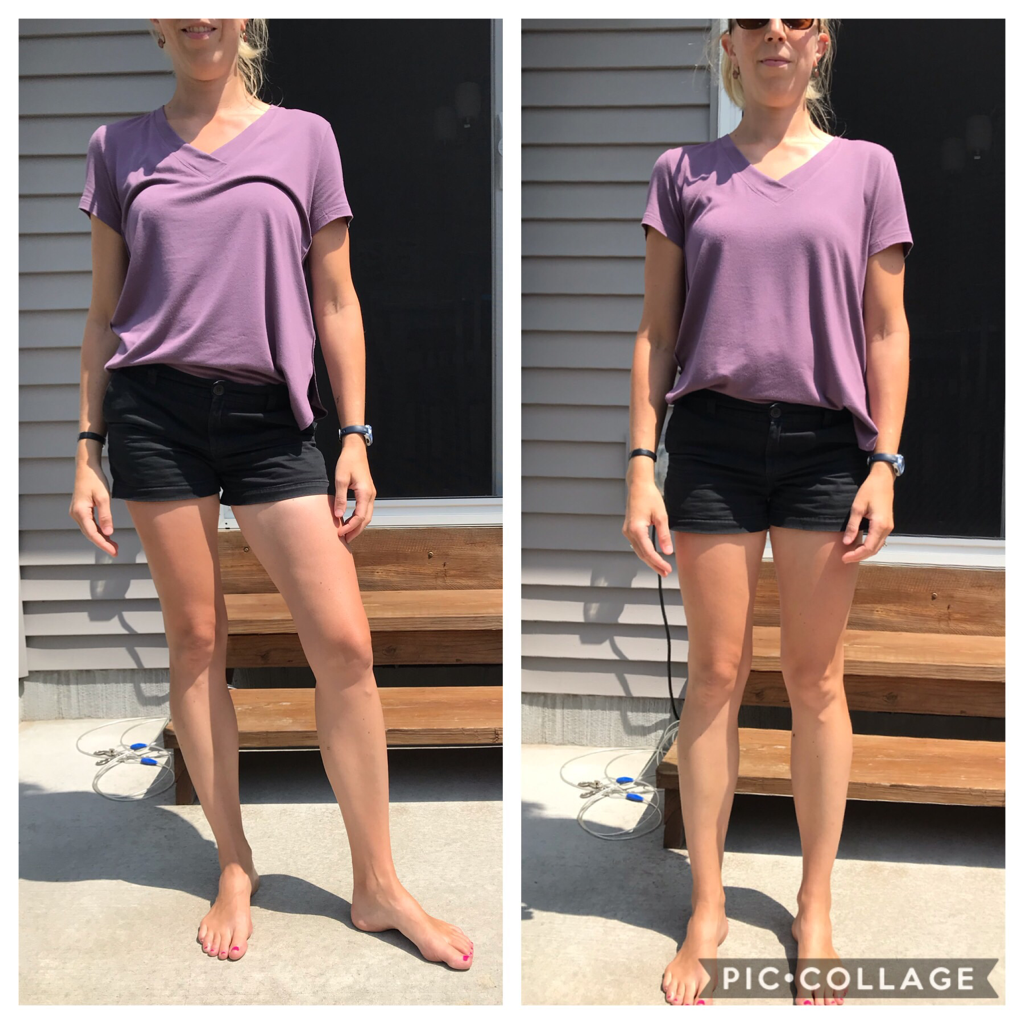
If you have a kid (or several) you likely do a lot of carrying of at least one or two of them. Let’s carry our kids better! First pic is what I see everywhere. Low back pain bonanza! Shoulder pain, hello! Pelvic heaviness, oof. And a bunch of other things. So, let’s use our muscles instead of hanging on our joints. Stand tall through the crown of your head, feet hip width apart and pointing forward, shoulders relaxed yet engaged slightly between the shoulder blades (like you're trying to hold a feather there), and engage your core! Not a full force contraction of your abdominals, but think of it more as a slight drawing in of the lower portion of the deep abdominals (transverse abdominals). As my 23 month old says, “Ta da, Mama!” Go try both out and see what you think. Takes a little more muscle power to do it right but then you’re squeezing in a mini core workout several times a day! For my ladies dealing with prolapse, tell your pelvic floors “you’re welcome,” for me. Standing like a schmo? Hello symptoms. Do it better and goodbye symptoms. 😘 Deep squat for back body expansion. Bellisimo. This is perfect for those of us with a high hinge point. This is the curve in the back that had migrated a little farther up towards mid back, commonly seen in the postpartum body. It is also usually much more exaggerated of a curve than the normal low lumbar curve we like to see.
Grab onto something very sturdy (i.e. won’t move!) and sit back enough that your arms will be straight. Relax into the squat and make sure the fronts of your ankles are relaxed, too (no tibialis anterior activation). Feet and knees together, head down if possible, and breeeeathe. Slow and deep, aiming for the bra line. You may (hopefully!) feel this down into your pelvic floor. If not, focus on this and see what you discover. Don’t let your breath go past your bum though. Let it stop there, otherwise too much efforting could create a bearing down 🛑. Do this for 3-5 good breaths and then go back to whatever you were doing. I try for a few of these daily. They help relax my very overactive paraspinals and are helping me work on decreasing a feisty anterior pelvic tilt! A modification for prolapse or knees that don’t enjoy end range flexion is sitting on a full foam roller, then wrap your arms around your legs instead of holding onto something. I personally have more difficulty with the modification and end up breathing more into my neck. More proof that everyone has different needs. Even with a prolapse I find the full squat works better *for me*. Try both and see what works better for you. I use a foam roller for the modification but you can use a yoga block, stair, curb, firm folded yoga-type blanket, etc. I will do these at the park sometimes, squatting down onto the low divider between the woodchips and grass and it works great! Dropping your head down helps to round the upper back and create more mobility there, but is not required. **Sound on if you are needing the jarring sounds of toddler noise during breakfast!
Another installment in the Breathing Basics series! I will go slightly in-depth into some of the key elements of really good 360 degree breathing. Let's get those diaphragms moving!!
Learning how to breathe into your back is hard work if you haven’t been using a great pattern (e.g. stress/shallow breathing, chest breathing, shoulder breathing). The easiest way to learn is in crocodile pose🐊 Lie prone on a firm surface and support your head with your hands or a small towel roll, legs extended, body relaxed. Breathe slowly and deeply 3-5 times, targeting your midback and lower ribs. Think “bra line” or where a heart rate monitor would sit. Dizziness is obviously a side effect of deep breathing, so keep really deep stuff to 3-5 breaths at a time, then resume quiet breathing. Do this as often as you think of it through the day. I also find this is a great way to chill out right before going to sleep. The goal is to create the habit of breathing fully into your back, belly, and sides, and to move you out of the all-too-typical stress breathing pattern of using our chest and shoulders. Learning how to exaggerate it with deep breathing is the first step, then you scale it back to a more functional application, quiet breathing (which is what you do all day long). At first it might be hard to feel anything moving if things are really sticky back there but use some visual feedback like a mirror or take a video of yourself so you can see. Aligning what you see with what you feel helps you to learn new tasks more rapidly. It also helps you find areas that need improvement. The more you do it the better you will get. Then, you can start working on this in different positions. Sitting in the car or a chair are good places because of the tactile feedback from the seat back. Did you know that full, diaphragmatic breathing can decrease blood pressure, re-frame stressful situations, improve your mood, improve your ability to recruit abdominals, relax paraspinals, and give your abs a workout, all in one sweet package?! It's true. Breathing correctly triggers a vagal response which kicks in the "rest and digest" area of the nervous system, the parasympathetic nervous system to be exact. If you really want to nerd out, check out Stephen Porges' Polyvagal Theory. It will cross your eyes and blow your mind. Being able to expand your ribs through your back is a key element of 360 degree breathing. More tips coming soon! In the meantime, breathe often and fully!! |
PaigeRunner, lifter of children, PTA, CPT, PCES, pelvic health zealot Archives
August 2020
Categories
All
Archives
August 2020
|

 RSS Feed
